You may be too old for the typical schoolgirl braids, but there are so many different types of braids that you can flaunt to look your stylish best. Whether you need to get your hair out of your face for an intense workout or want to look elegant at a wedding, braids have got your back! If you have seen others flaunting unique types of braids and have thought that they must be hard to recreate, you are wrong, my friend! Today I am here to share with you some tips to create beautiful braids on your own with ease. So, grab a hairbrush, and let’s get started!
Prepping The Hair!
No matter what your braiding style of choice, the hair needs to be prepped first. You need to detangle your hair completely for a smooth braiding process. Also, braids don’t hold so well on silky hair, so you may need to use a texturizing spray to make sure that your braids stay in place all day long. First, brush your hair until it is fully detangled, and then spritz some texturizing spray all over the lengths. Also, if you are braiding your own hair then make sure to have lots of hairpins and ties close to you before you begin. Trust me, there is nothing more annoying than searching for a hair tie with half-braided hair!
Back To The Basics
I am sure that most of you know how to create a simple braid, but let us still revisit the basics. For a regular braid, you need to split your hair into three sections at the nape of your neck. Now take the left section over the middle section and hold it there. The left section now becomes the middle section. Then take the right section over the middle section. This completes one stitch. Now repeat this until you are left with around an inch of hair at the bottom. Secure the braid in place with a hair tie. You can gently pull at the right and left sections to add more volume to the braid.
This simple 3-strand braid is super easy to make and is the best option for when you are in a hurry. Do keep what a basic stitch is in mind as we are going to use it to create different types of braids!
The Elegant French Braid
The French Braid is the perfect option for when you want to look put together without too much effort. This braid starts at the top of the head and flows into a simple 3-strand braid at the neck. It may look intricate, but is honestly quite easy to create! Simply take a section of hair at the top of your head and divide it into 3 sub-sections. Now, with these 3 sections, create a simple stitch as you would in a regular braid.
Now, from the second stitch onward, keep adding tiny sections of hair to the existing left and right sections and continue braiding till you reach the neck. For an even French Braid, try to keep the size of the sections you add at each stitch similar. Once you reach the neck and have no more hair to add to the braid, start braiding the hair into a regular braid. Secure the braid with a hair tie at the end. And that’s it! Your French Braid is ready!
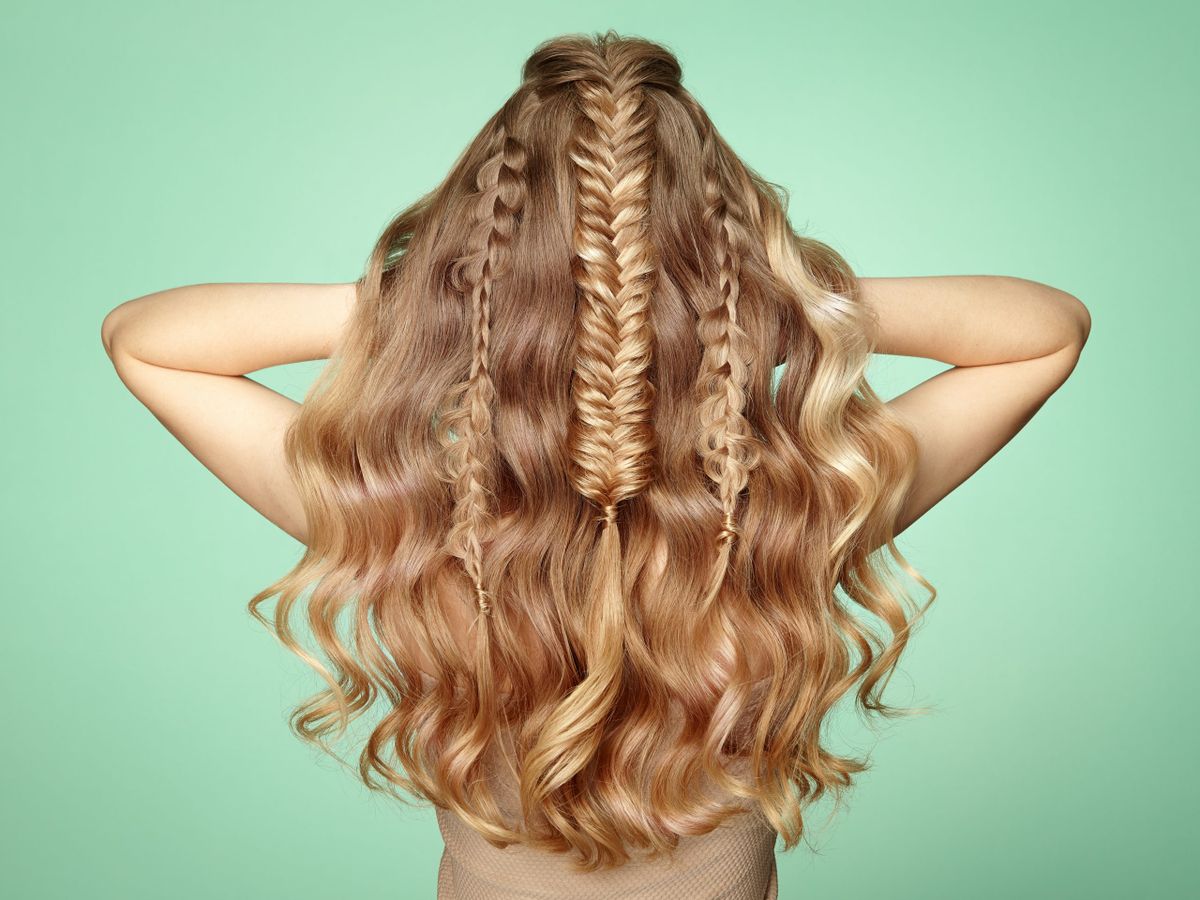
The Whimsical Fishtail types of braids
A Fishtail Braid is a beautiful style for a side braid. It pairs perfectly with flowy summer dresses as well as bridesmaids’ dresses. Contrary to popular belief, this braid is pretty simple to create too! Simply tie all your hair into a side ponytail that falls over one of your shoulders. Now, divide the ponytail into two equal sections. Then take a small section of hair from the outer edge of the left section and add it to the back of the right section. Then take a small section of hair from the outer edge of the right section and add it to the back of the left section. Repeat this process till you have an inch of hair left at the end. Secure the braid in place with a hair tie.
For a polished look, keep the size of the sections that you keep adding to the braid equal at each step. Also, if your haircut has layers then some strands may jut out from the braid. You can push them in place with a hairpin. Be generous with the texturizing spray while prepping your hair to get a beautifully defined fishtail braid!
The Voluminous Dutch Braid
The Dutch Braid is an excellent choice for those with fine hair as it adds volume at the crown. It is essentially a reverse French Braid where you start at the top of the head with a section of hair. Divide it into three sections and create one reverse stitch. For the reverse stitch, take the left section under the middle section instead of over the middle section as you would in a French Braid. Now take the right section under the middle section. This is one reverse stitch.
Now continue adding reverse stitches while adding small sections of hair to both the right and left sections, as you would in a French Braid. Once you hit the neck, continue reverse braiding till the end and secure the braid in place with a hair tie. This braid is quite unique and eye-catching. It is perfect to wear to the gym or while hiking.
The Quirky 4-Strand Braid
4-Strand Braids are a whole different class of braids and not just one style of braiding. Today I will tell you about one easy way to create a quirky 4-strand braid. Start with sectioning your hair into 4 sections. Now take the leftmost section to the right over the adjacent two sections and then to the left under one section. So, you are basically twisting this section inwards over two sections and then bringing it outwards under one section. Now take the rightmost section to the left over the adjacent two sections and then to the right under one section. Repeat this process alternately with the right and left sections.
You will be left with a quirky braid that has a unique twisted pattern! Trust me, it is way easier to create than it sounds. Try it once and you will be able to ace this braiding technique!
The Twisty Rope Braid
A Rope Braid is perhaps the easiest braid to create when you are not good at braiding! For this quick braid, first create a high ponytail and secure it with a hair tie. Then divide the ponytail into two sections. Twist these sections individually in a clockwise direction. Now twist them around each other in an anti-clockwise direction. Secure with a hair tie at the end. You have now created a playful Rope Braid that pairs well with sporty looks!
The Stylish Pull-Through types of braids
A Pull-Through Braid is a braid type that adds volume and has a chic factor too. It is perfect to wear to work as it looks very smart but unique. For this hairdo, you need to create a small ponytail at the top of your hair with a section of hair at the middle. Now create another small ponytail below the first ponytail. Then divide the upper ponytail into two sections. Bring the two sections around the lower ponytail and tie them together at the bottom. This way, you have enclosed the second ponytail between the two sections of the first ponytail. Now tie a third ponytail under the second ponytail and then enclose it with the two sections of the second ponytail. Continue doing this till you reach your neck and have no hair left to tie a new ponytail.
With the last two ponytails, do one final enclosing stitch and secure the ends with a hair tie. Voila, you now have a stylish pull-through braid that you created all by yourself!
The Angelic Waterfall Braid Types
A Waterfall Braid is a great way to get your hair out of your face while looking ethereal at the same time! For this braid, you need to part your hair at the middle or side as per your preference. Then pick out a thin section of hair at the parting. This section should border your forehead. Now divide this section into 3 sections and create a regular stitch. With the second stitch, bring the inner section over the middle section as usual, but drop it and let it fall over your face. Then pick up a new section of hair as the inner section for the next stitch and let it drop as well. Continue this till you reach your ear and secure the braid in place with a hairpin.
In the case of a middle parting, do this on both sides of the head. You can leave the hair at the back open, or can tie them in a braid or bun. This hairstyle is perfect for all kinds of special occasions, including weddings and proms.
Gorgeous Updos With Different Braid Types
You can always be creative and can combine different types of braids or can pin them into a bun. A lot of gorgeous braided updos can also be created once you master the art of braiding. Here are some of my favorites.
Reverse Braid Bun
For this unique hairdo, bend your neck and flip your hair downwards. Then pick the hair at the back of your head and braid them till you reach the top of your head. Now twist the remaining hair into a messy top bun. This hairstyle looks basic from the front but is extraordinary from the back!
Milkmaid Braid types of braids
On the days when you are feeling cute, or are dealing with dirty hair, Milkmaid Braids will come to the rescue! Create a simple braid each on either side of your face, starting as close to your forehead as possible. Now flip the right braid over your head towards the left ear and pin it in place. Then flip the left braid towards the right ear and pin it too. This will create a double braided headband look at the front. Create a simple bun at the back to finish the look.
French Braid Low Bun
Elevate your basic low bun by adding a French braid to it. Simply create a French Braid in your hair till you hit your neck. Then tie up the hair at the bottom in a messy low bun. Add an embellished hairpin to the bun for a special occasion and look your fanciest best in a matter of minutes!
I hope that I have given you enough ideas to flaunt different types of braids every day of the week! As with everything else in life, perfection in braiding comes with practice! So, if you are planning to wear these types of braids to an event, make sure to practice beforehand. I am sure you will get tons of compliments on your braided hairdos in the days to come!